Printable 3D-pen planning and tracing support
Draw flat, join, cool, test
Start on paper: Draw four equal square sides and a square base. Plan one connected pattern for each side, leaving the top open. Draw your project’s outline and joining points on the blank grid. This is a planning template, not a finished-project picture.
- Teacher sets up the exact pen using its manual and verifies its filament and surface compatibility.
- Practice a short straight line, a closed loop and two lines joined together. Stop extrusion before moving between shapes.
- Let the practice shapes fully set. Check whether the joint holds before beginning your planned project.
- Put the paper design beneath a manufacturer-approved transparent tracing surface only if the manufacturer allows it. Do not extrude directly onto this printout or an unapproved plastic cover.
- Trace the large outline first, then the connecting details. Cool completely before removal; ask for adult help with upright assembly.
Template sizes: Print at 100% / actual size and measure the calibration line. The grid squares should be 1 cm. If the printer scales the page, redraw the required measurements with a ruler.
Label your plan: outer edge / joining points / part to make first / part to add next. Draw a second outline if your project needs matching parts.
Measured shape starters
Use the size named in your lesson, or draw its custom outline on the grid. These are tracing guides, not final artwork. Join interior details to an outline; isolated dots will become loose pieces.
Teacher equipment references
- 3Doodler Start+: child-oriented low-temperature model information
- Manufacturer FAQ: model and filament compatibility
These references describe the example equipment, not every pen. Follow your exact model’s manual and the safety section below. No temperature number is prescribed across different models.
For teachers
Engineering standards
This shows how the lesson connects to the national NGSS engineering standards and what student work you can collect.
3-5-ETS1-1
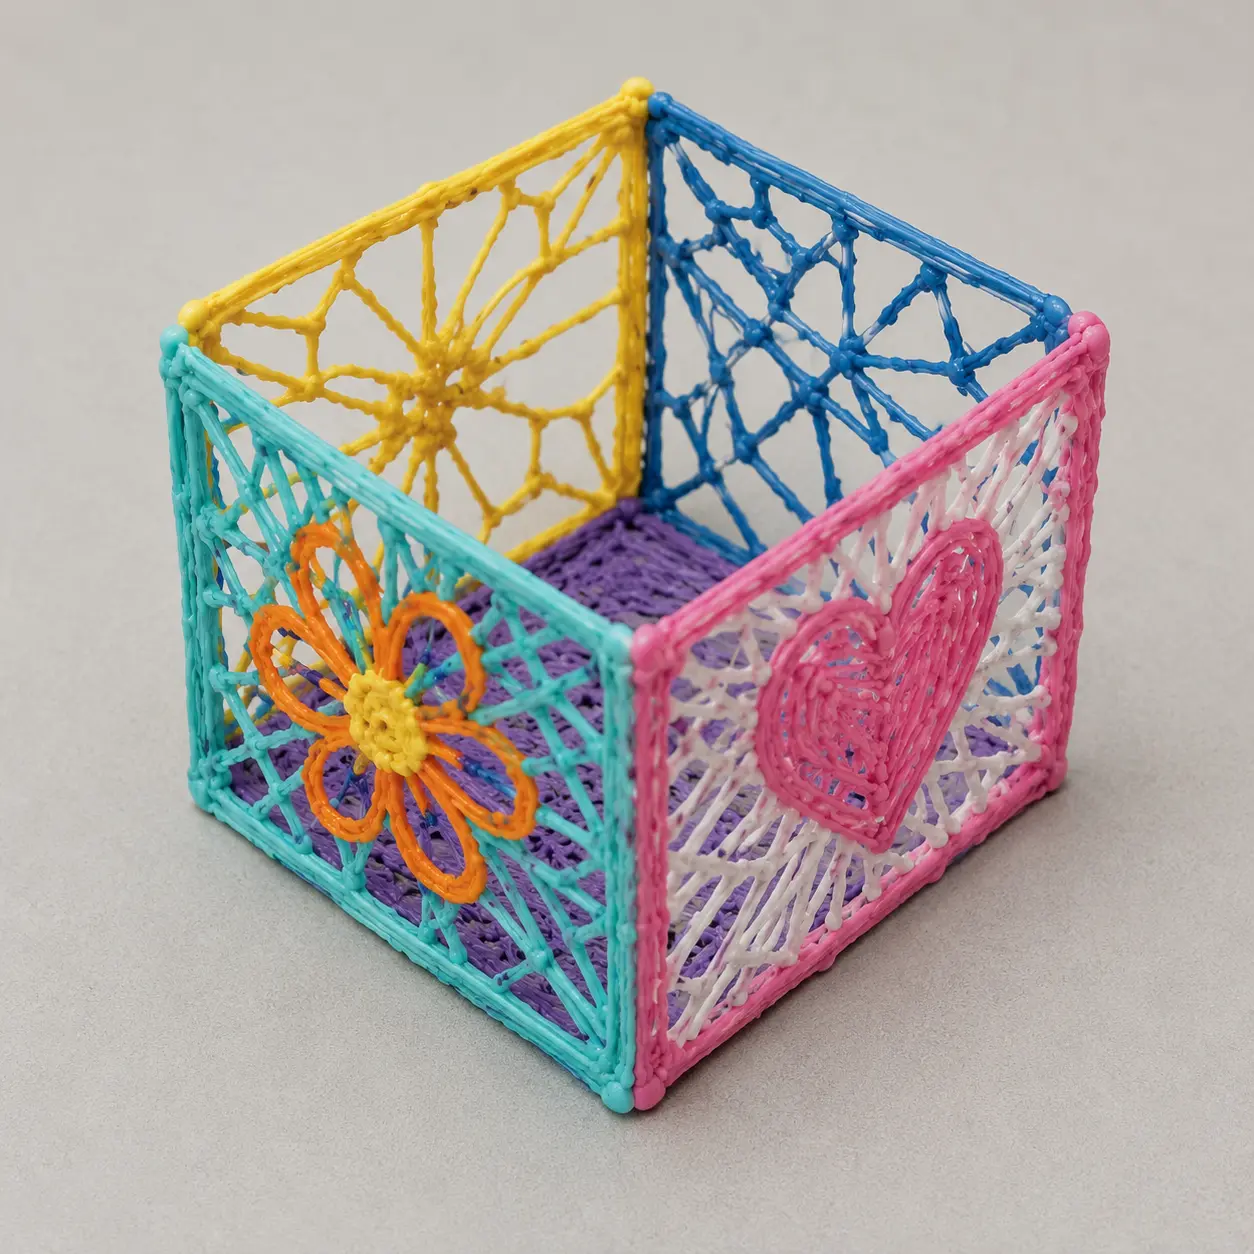
Define the need in Make a small open cube frame from matching flat square panels and decorate its faces with connected lines. Agree on the two success checks and the listed material limits.
What students show: Two labeled ideas with the target and limits stated.3-5-ETS1-2
Compare the ideas using the project checks: Panels form a stable open cube; Corners stay joined through gentle handling.
What students show: A selected design with a reason connected to a success check.3-5-ETS1-3
Test, change one feature and retest: Place the frame on a flat table and lift it gently three times. Check rocking and opening corners. Rejoin one weak corner or add one short brace and repeat after cooling.
What students show: Before-and-after results collected under the same conditions.Materials
- Approved low-temperature pen kit
- 4 cm square tracing guide
- teacher assembly jig
- Pencil, planning paper and the printable design brief below
- Paper planning template below; manufacturer-compatible tracing mat/surface; approved pen stand; teacher-controlled filament allowance
Teacher preparation
- Reference classroom pathway: a child-appropriate, low-temperature 3Doodler Start+ with its specified Start+ Eco-Filament and compatible tracing surface, or a teacher-verified equivalent used exactly according to its own manual. Do not assume all 3D pens have a cool tip.
- Adult verifies age rating, ventilation, pen condition, filament compatibility and school approval. High-temperature PLA/ABS pens are not an interchangeable student substitute; use the paper pathway or an adult demonstration if suitable equipment is unavailable.
- The teacher handles loading, jams, charging and model-specific setup. Use only the manufacturer-approved filament and surface; never assume printer filament, a generic mat or ordinary plastic sheet is compatible.
- Keep the tip and fresh material away from skin, hair, clothing, food and faces. Work on the approved surface, park the pen safely and let parts fully set before handling. No tracing on bodies, wearing pieces, food-contact uses or electrical repairs.
- Adults assist with upright assembly and inspect cooled pieces for sharp ends or loose fragments. Use large simple shapes; collect scraps and do not mouth parts.
- Rehearse this specific build: Trace panels flat on the approved surface and let each cool fully. Keep dimensions matched to the guide. With the teacher’s assembly support, join one side to the base at a time. Allow each joint to set before adding the next.
- Print the template at actual size and check its calibration line. Students draw their own design on paper first; use it only beneath a manufacturer-approved transparent tracing surface. The page itself is not a heat-rated work mat.
Step by step
How to teach it
See the job and plan
- Introduce the finished object: Make a small open cube frame from matching flat square panels and decorate its faces with connected lines.
- Draw four equal square sides and a square base. Plan one connected pattern for each side, leaving the top open.
- Students say what would count as a successful result.
Model the unfamiliar action
- Demonstrate slowly: Trace panels flat on the approved surface and let each cool fully. Keep dimensions matched to the guide.
- Pause so partners can repeat the action; provide a thick-line template if pen control blocks progress.
Build the first version
- With the teacher’s assembly support, join one side to the base at a time. Allow each joint to set before adding the next.
- Partners swap builder and checker roles halfway through. Check the working part before decorating.
Try once and save
- Run one trial of the stated test to locate an obvious problem. Do not count a changed procedure as a fair comparison.
- Label and store the model; sketch its current shape and clear the work area.
Predict and set up
- Revisit the two success checks. Agree on identical starting conditions and prepare a before/after results table.
Collect evidence
- Place the frame on a flat table and lift it gently three times. Check rocking and opening corners.
- One student operates while the other records. Swap for a later trial while noting a change of operator if it affects the result.
Change one thing
- Rejoin one weak corner or add one short brace and repeat after cooling.
- Keep the original results rather than replacing them with only the best attempt.
Explain and clean up
- Present the cube, panel plan and corner-check results. Do not use it to hold heavy or hot objects.
- Collect the brief and results; separate reusable materials and clean the test area.
Finish joins without rushing
- Use 10 minutes to rehearse or repair one join with adult help, 20 for cooled assembly and testing, and 15 for presentation and cleanup.
- Cooling and safe assembly take priority over finishing in two sessions.
Assessment
- Panels form a stable open cube
- Corners stay joined through gentle handling
- Student demonstrates the actual task: Place the frame on a flat table and lift it gently three times. Check rocking and opening corners.
- Record includes failures as well as successes.
- Student identifies one changed feature and uses the retest to explain the result.
Supports & extensions
- Begin with one connected flat outline. Teacher models starting, stopping and making a joint before students add details.
- Provide a thick-line paper plan and large connected shapes; allow a partner or adult to assist with control.
- Make flat parts first. An adult assists with upright joints; add a third session rather than rushing cooling or assembly.
Safety & responsible use
- Reference classroom pathway: a child-appropriate, low-temperature 3Doodler Start+ with its specified Start+ Eco-Filament and compatible tracing surface, or a teacher-verified equivalent used exactly according to its own manual. Do not assume all 3D pens have a cool tip.
- Adult verifies age rating, ventilation, pen condition, filament compatibility and school approval. High-temperature PLA/ABS pens are not an interchangeable student substitute; use the paper pathway or an adult demonstration if suitable equipment is unavailable.
- The teacher handles loading, jams, charging and model-specific setup. Use only the manufacturer-approved filament and surface; never assume printer filament, a generic mat or ordinary plastic sheet is compatible.
- Keep the tip and fresh material away from skin, hair, clothing, food and faces. Work on the approved surface, park the pen safely and let parts fully set before handling. No tracing on bodies, wearing pieces, food-contact uses or electrical repairs.
- Adults assist with upright assembly and inspect cooled pieces for sharp ends or loose fragments. Use large simple shapes; collect scraps and do not mouth parts.
No-machine alternative
Build the same design from thick paper strips and tape. Follow the same shape, connection and display tests. Label it a paper prototype: Make a small open cube frame from matching flat square panels and decorate its faces with connected lines.
Printable student design brief
The challenge
Make a small open cube frame from matching flat square panels and decorate its faces with connected lines.
Success criteria
- Panels form a stable open cube
- Corners stay joined through gentle handling
- Record the stated test and explain one revision
Constraints
- Teacher-approved low-temperature pen and matching filament only
- Trace flat parts on the approved surface; adult helps with upright joining
- Follow the teacher’s size and filament limit; no body-worn or food-contact objects